Waveform Highlighter in Astro (no libraries)
Upload a WAV, drag to select a region, loop it.
I wanted to create a simple audio player where I can upload a WAV, drag to select a section, and loop that section. The nice thing about Astro is you can build something interactive without committing to a whole front-end framework. This page uses zero third-party libraries and only uses a small script for the waveform. This post explains what the widget does and how to use it.
What it does
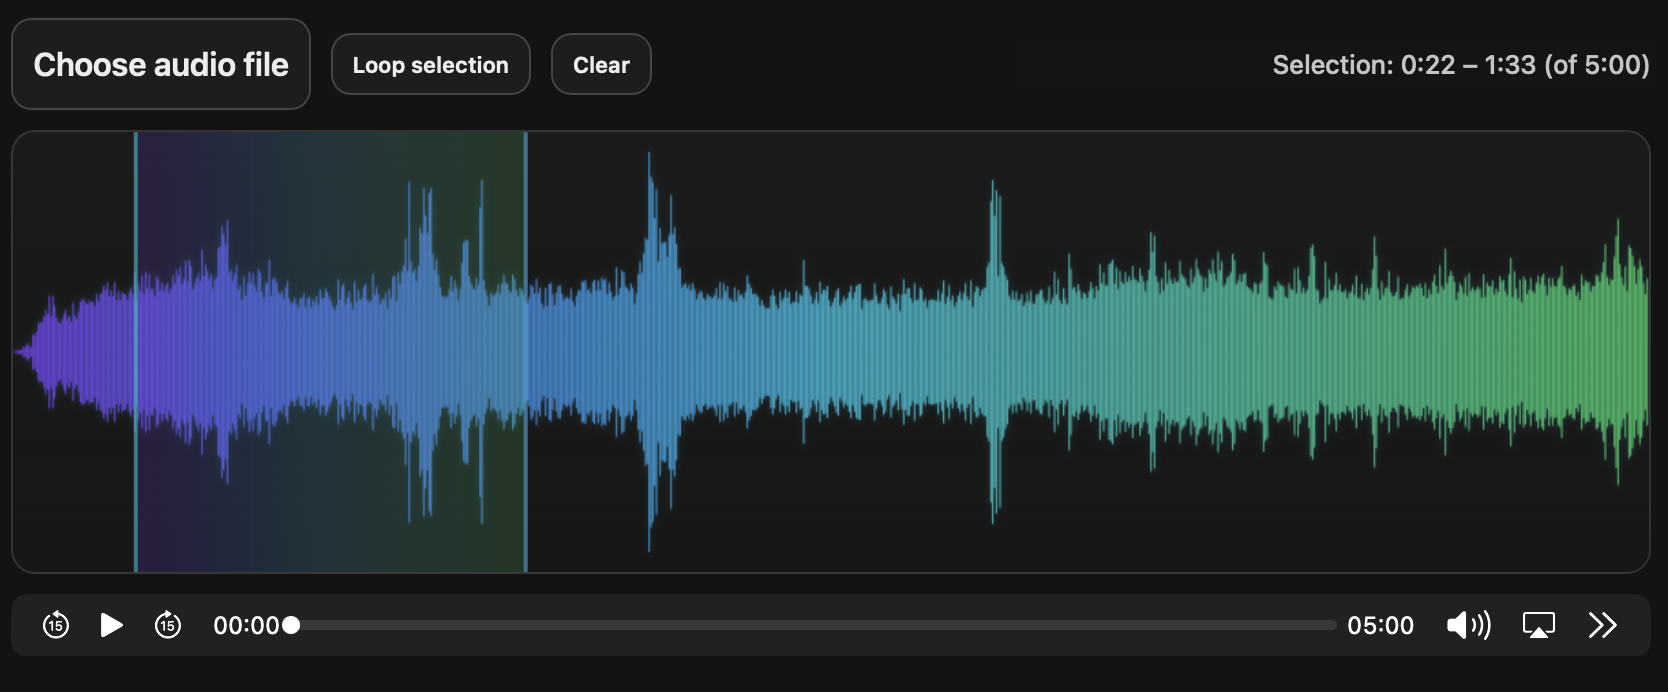
The component is a single widget where you can upload an audio file. The page decodes it in the browser and draws a waveform to a <canvas>. You drag across the waveform to create a selection, which shows as a tinted highlight, then loop the selection to repeat that region. Playback stays on a normal <audio> element. It uses Web Audio only to decode samples for drawing.
Demo
Here’s the widget embedded in this post:
If you want to test quickly then you can download and upload this sample audio clip into the widget:
Download the demo WAV: waveform-demo.wav
How to use it
Click Choose audio file, pick a WAV/MP3, then drag on the waveform to select a region. The loop button enables once the selection is long enough. Click Loop selection to loop it. Click again to stop. Clear removes the selection.
How it’s built
The component has four parts:
- a file input (
<input type="file">) - a
<canvas>for drawing the waveform - a selection overlay
<div>positioned over the canvas - a normal
<audio controls>element for playback
1. Load the file and play it
When the user picks a file, I create a blob URL and point the audio element at it. That means there’s no upload step and playback works immediately.
let objectUrl = null;

fileInput.addEventListener("change", async () => {
  const file = fileInput.files?.[0];
  if (!file) return;

  if (objectUrl) URL.revokeObjectURL(objectUrl);
  objectUrl = URL.createObjectURL(file);
  audio.src = objectUrl;
});
2. Decode audio for waveform drawing
The waveform comes from decoded samples using Web Audio. I’m not doing live processing, so I decode once into an AudioBuffer, read the data, then close the audio context (so the browser doesn’t keep an audio device open).
async function decodeForWaveform(arrayBuffer) {
  const AC = window.AudioContext || window.webkitAudioContext;
  const ac = new AC();
  try {
    const audioBuffer = await ac.decodeAudioData(arrayBuffer.slice(0));
    return audioBuffer;
  } finally {
    // avoid keeping an audio device open
    try { await ac.close(); } catch {}
  }
}
3. Convert samples into peaks
Raw audio can be millions of samples. A canvas is only about 900–1200 columns wide. So I compress the audio into a “peak per column” array. For each column, scan a block of samples and store the max absolute amplitude. That gives a clean “envelope” of the waveform without trying to draw every single sample.
function computePeaks(audioBuffer) {
  const target = 900; // number of vertical bars
  const chan = audioBuffer.getChannelData(0);
  const sampleRate = audioBuffer.sampleRate;

  // safety: only use the first N seconds to draw the waveform
  const maxSamples = Math.min(
    chan.length,
    Math.floor(sampleRate * Number(maxSeconds))
  );

  const blockSize = Math.floor(maxSamples / target) || 1;
  const peaks = new Float32Array(target);

  for (let i = 0; i < target; i++) {
    let max = 0;
    const start = i * blockSize;
    const end = Math.min(start + blockSize, maxSamples);

    for (let j = start; j < end; j++) {
      const v = Math.abs(chan[j]);
      if (v > max) max = v;
    }

    peaks[i] = max;
  }

  // normalize 0..1
  let m = 0;
  for (let i = 0; i < peaks.length; i++) if (peaks[i] > m) m = peaks[i];
  if (m > 0) for (let i = 0; i < peaks.length; i++) peaks[i] /= m;

  return peaks;
}
4. Draw the waveform
Once you have peaks, drawing is just vertical lines around a midline.
function drawWave(peaks) {
  const w = canvas.width;
  const h = canvas.height;

  ctx.clearRect(0, 0, w, h);
  ctx.fillStyle = "rgba(0,0,0,0.03)";
  ctx.fillRect(0, 0, w, h);

  // mid line
  ctx.strokeStyle = "rgba(0,0,0,0.10)";
  ctx.beginPath();
  ctx.moveTo(0, h / 2);
  ctx.lineTo(w, h / 2);
  ctx.stroke();

  // waveform gradient
  const waveGrad = ctx.createLinearGradient(0, 0, w, 0);
  waveGrad.addColorStop(0.0, "#7c3aed"); // purple
  waveGrad.addColorStop(0.5, "#06b6d4"); // cyan
  waveGrad.addColorStop(1.0, "#22c55e"); // green

  ctx.strokeStyle = waveGrad;
  ctx.lineWidth = 1;

  const half = h / 2;
  const step = w / peaks.length;

  ctx.beginPath();
  for (let i = 0; i < peaks.length; i++) {
    const amp = peaks[i];
    const y = amp * (half - 10);
    const x = i * step;
    ctx.moveTo(x, half - y);
    ctx.lineTo(x, half + y);
  }
  ctx.stroke();
}
5. Drag to select a region
Selection is stored as seconds (selStart, selEnd). Dragging is handled with pointer events on the canvas. X coordinates get converted into time using the file duration.
function secondsFromX(clientX) {
  const rect = canvas.getBoundingClientRect();
  const x = Math.max(0, Math.min(clientX - rect.left, rect.width));
  return (x / rect.width) * duration;
}

function pointerDown(e) {
  if (!duration) return;
  isDragging = true;
  const t = secondsFromX(e.clientX);
  selStart = t;
  selEnd = t;
  refreshOverlayAndButtons();
}

function pointerMove(e) {
  if (!isDragging) return;
  selEnd = secondsFromX(e.clientX);
  refreshOverlayAndButtons();
}

function pointerUp() {
  if (!isDragging) return;
  isDragging = false;
  refreshOverlayAndButtons();
}

canvas.addEventListener("pointerdown", pointerDown);
window.addEventListener("pointermove", pointerMove);
window.addEventListener("pointerup", pointerUp);
The visible highlight is not drawn into the canvas. It’s a separate absolutely positioned div over the canvas.
function updateSelectionOverlay() {
  if (selStart === null || selEnd === null || duration <= 0) return;

  const left = (Math.min(selStart, selEnd) / duration) * canvas.clientWidth;
  const right = (Math.max(selStart, selEnd) / duration) * canvas.clientWidth;

  selEl.style.left = `${left}px`;
  selEl.style.width = `${Math.max(0, right - left)}px`;
}
6. Loop the selection
Looping is handled by watching the audio playhead and jumping back to the selection start when it reaches the end.
function onTimeUpdate() {
  if (!loopEnabled) return;
  if (selStart === null || selEnd === null) return;

  const a = Math.min(selStart, selEnd);
  const b = Math.max(selStart, selEnd);
  if (b - a < 0.05) return;

  if (audio.currentTime < a || audio.currentTime > b) {
    audio.currentTime = a;
  }

  // when we approach the end, jump back (tight loop)
  if (audio.currentTime >= b - 0.01) {
    audio.currentTime = a;
    audio.play().catch(() => {});
  }
}

audio.addEventListener("timeupdate", onTimeUpdate);
I also disable the loop button unless the selection is long enough. Otherwise it feels broken, because you can “loop” a nearly-zero selection and nothing obvious happens.
A couple of practical notes
Safari support depends on the codec inside your WAV. WAV is a container, and not every encoding inside it decodes everywhere. If you hit “Could not decode this file…”, try exporting 16-bit PCM WAV, or use MP3/M4A.
Also, canvas has two sizes: its internal pixel buffer (width/height attributes) and its CSS size. I keep the attributes fixed for consistent drawing, and scale the element with CSS for layout.